

Furniture frames are often hardier than the upholstery covering them — espeically the cushions, which can wear out quicky if you have a pet or small children. Yet professonal reupholstery can cost almost as much as buying new furniture.
If you’re open to learning while you go and not expecting perfectt results the first time, you would do well to start with an ottoman or chair until you get the hang of things. Eventually you might size up to a headboard, chaise, and couch, perhaps in that order.
Oh, and forget about anything involving stitching unless you want to study to become a professional upholsterer. Instead, think about a staple gun or glue gun. Which type of adhesive you use should be dictated by the project. See the very bottom section of this post for a rundown on all the different types of adhesives.
Reupholstery Materials and Tools
- Chair, ottoman, headboard, or couch
- Fabric that is at least twice the square footage of the area you wish to cover (including all panels)
- Extra batting or pillow form, where needed
- Strong adhesive, stapler, or staple gun (see sidebar at the end of this post)
- Scissors
- Tape measure
- X-acto knife
- Pins
- Rubber gloves (if working with an adhesive product)
- Plastic or metal scraper or spatula to apply the glue
- Clamps, weights, or heavy books for use while the glue dries.
- Glue solvent (optional)
- Glue gun (optional)
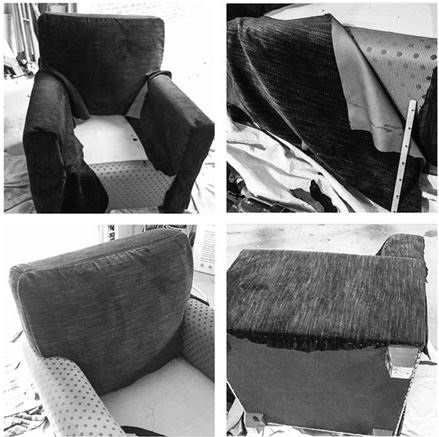
How to Reupholster a Chair
 . Remove the seat from its frame. Carefully measure the surface of the seat, adding at least several inches to each side, and cut out a swath of fabric. (Remember: Too much fabric is better than too little—you can always trim the excess later.)
 . Apply a thin coat of adhesive to the seat and attach it to the pillow form or batting. Now glue or spray the combined cushion and lay it down on the fabric, smoothing out wrinkles with your hands.
 . Apply pressure using clamps, weights, or heavy books and let dry for at least the amount of time specified on the label for that type of glue. Allow at least 24 hours for each surface to dry — yes, that could drag out the duration of this project.
 . Tuck the extra fabric underneath the seat (trim it if there’s a lot of excess) and reattach the seat to the frame. Once the adhesive is dry, turn the chair onto its back and repeat the procedure for the backrest. Trim any excess material with an X-acto knife for a precise cut. Hide seams by tucking them into the folds and creases of the furniture.
All About Adhesives
Picking the right goo for the job requires you to weigh durability against the risk of seepage. Use clear adhesives to minimize glue stains on black or white fabric, and glue a test patch to see if a lighter adhesive— such as a spray-on product—is in order.
Upholstery projects can use up lots of sticky stuff, so jot down your piece’s measurements and ask a salesperson for help on how much you should buy. Here are just a few of your many options.
Contact cement: Use very sparingly unless you’re working with a dense (not too porous) material such as leather or vinyl.
Epoxy: Bonds permanently and works well for tricky materials such as vinyl and fake fur. Don’t forget to mix it beforehand.
Krazy Glue: Good for quick fixes and small repairs, but not meant for large surface areas.
Liquid Nails: Best glue for vinyl, leather, suede, and other heavy-duty fabrics. Buy it in a can and get the pressurized applicator—the tubular variety requires too much muscle.
Spray-on adhesive: Ideal for thin fabrics, as it’s practically impossible to over-glue surfaces without getting a cramp in your finger.
Stitch Witchery: This iron-on fabric glue is best saved for clothing projects.
Water-soluble glue: Tends to peel off easily. Recommended for beginners with unsteady hands. Apply with a glue gun for extra sticking power.
Staple gun: OK, we know it’s not technically an adhesive, but it is the tool of choice among professional upholsterers, who use it to affix leather and other thick materials to wood frames. It is also a vast improvement over the garden-variety stapler. Drape a single sheet of thin fabric over the entire seat or headrest (or whatever you’re covering), so the staples are visible only on the underside of the object.
Stapler: An office stapler might suffice if you’re in a hurry or want to fix mistakes. As recommended above, use the draping method and staple only along the underside or back of the frame. Position the finished work against a wall.
Jackie Cohen is an award winning financial journalist turned turned financial advisor obsessed with climate change risk, data and business. Jackie holds a B.A. Degree from Macalester College and an M.A. in English from Claremont Graduate University.